EP2DCOverview
The EPrints to Data Centre (EP2DC) plugin extends EPrints to support uploading to a remote data centre any XML-formatted experimental data associated with a deposit.
Contents
Introduction
EP2DC is a prototype plugin designed to enable EPrints to support the submission of XML-formatted experimental data sets together with the manuscript to which they correspond. The work recognizes the worth and potential for reuse of high quality experimental data, and is consistent with trends in scientific publishing and funding policy that advocate a more responsible approach to managing research data.
The EP2DC plugin is the realization of the JISC-funded EP2DC Rapid Innovation Project, and the support of JISC, both financial and managerial, is gratefully acknowledged.
An EPrints repository configured for the EP2DC plugin is hosted by the University of Southampton School of Engineering Sciences at EP2DC EPrints Repository. Whilst the EP2DC plugin has been tested and refined by an integration with the JISC-funded Materials Data Centre, it is designed for integration with any data centre.
Trialing the EP2DC Service
As already mentioned, EP2DC is a module designed to serve the data capture needs of the scientific community. A demonstrator has been integrated with the Materials Data Centre, itself presently configured to manage data that comply with the MatDB schema. To trial the service, perhaps in anticipation of installing at your own EPrints repository, or simply to gain an understanding of the direction data management in the UK HE sector is taking, you are invited to upload a sample file and data set, as follows:
- Navigate to EP2DC EPrints Repository.
- If not already registered, use the Create Account link at the top left of the landing page to create an account.
- Once logged-in, click the New Item button on the Manage Deposits page. This opens the Edit Item page, which is the entry point for depositing a new item.
- The workflow for creating/editing a deposit is shown in a navigable bar towards the top of the page, as shown in the figure:
- The EPrints stages are designed to be intuitive, with Help icons adjacent to each field. Required fields are marked with a red star, but in an effort to simplify the process of depositing an item, these are kept to a minimum.
- The new stage that the EP2DC module introduces is labelled EP2DC Data. At this stage you can upload a MatDB-compliant data set, add some additional metadata, and set the access rights, which are open, accessible to registered users, or available on demand. For the purposes of trialing the service, a sample data set at SampleMatDBCompliantDataSet can be copy/pasted into an XML file (the XML extension is important because the EP2DC module filters on this file type).
- At the Deposit, clicking Deposit will deposit the data set to the MDC repository, and the accompanying manuscript (or other unit of work associated with the data) to the EP2DC EPrints repository.
- Once the data (and the accompanying manuscript or other unit of work associated with the data) are deposited, the standard EPrints search options can be used to retrieve the deposit.
Features
The EP2DC module affects the default stages for upload and deposit, as well as the page displayed when a unit of work that includes a remotely stored data set is retrieved.
Data Upload
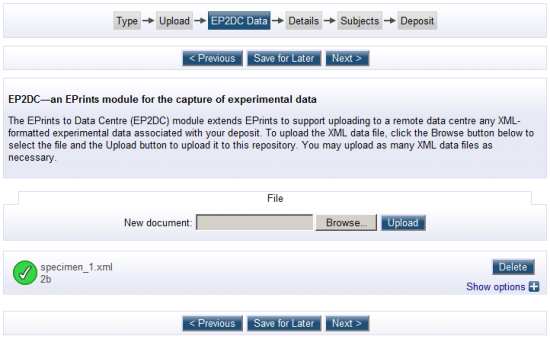
As shown in the adjacent figure, the EP2DC plugin extends the default EPrints stages with an additional EP2DC stage for uploading experimental data.
Data Options
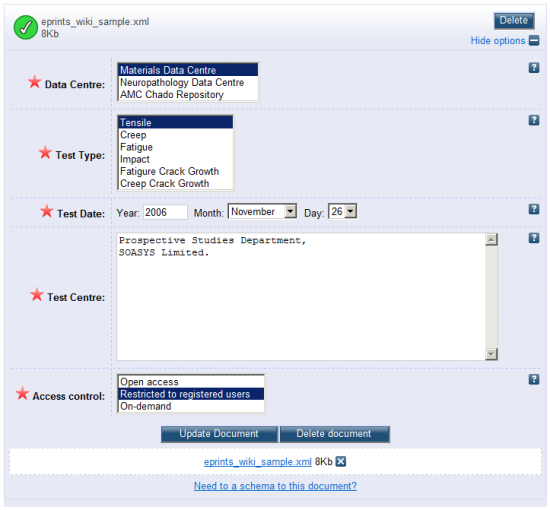
The EP2DC stage for uploading experimental data includes an options (collapsed in the previous figure) that allows metadata associated with the test data to be entered. The fields marked with a red star are mandatory. As shown in the adjacent figure, one of these madatory fields defines the access control. This field affects the data retrieval process, as follows:
- Open—allows data retrieved from the EP2DC EPrints repository to be downloaded by anyone.
- Restricted to registered users—allows data retrieved from the EP2DC EPrints repository to be downloaded by by registered users.
- On demoand—data is supplied on request direct from the owner.
Data Deposit
The last stage in the EPrints default workflow is to deposit the unit of work (meaning all of the documentation, figures, etc. together with the accompanying data). The data will be deposited ataa remoted data centre, which is responsible for validating the data against the corresponding XML Schema Definition. If the data sets is validated and deposited successfully, a page similar to that shown in the adjacent figure is displayed.
Data Retrieval
As shown in the adjacent figure, when an item that has accompanying data is retrieved, in the case where a data set is unrestricted (meaning open access or accessible to registered users), there is an accompanying link to the data.
In the case where the data set is available on demand, a message can be sent to the owner requesting that a copy of the data set be provided.
EP2DC Plugin Installation
Installation of EP2DC at an existing EPrints repository (version 3.1 or higher) has been designed to be a simple as possible.
Prerequisites
PERL modules, all of which are available from CPAN:
- LWP::UserAgent
- HTTP::Request::Common
- Authen::NTLM
- LWP::Authen::Ntlm
- HTML::Entities
Install
Assuming the EPrints install path is /opt/eprints3, and that the name of your archive is ARCHIVE_ID, the following actions are required to install the EP2DC plugin:
cd /opt/eprints3/archives/ARCHIVE_ID
cp mdc-1.0.tar.gz .
tar zxvf mdc-1.0.tar.gz
This will copy most of the files at the right location.
cd /opt/eprints3/archives/ARCHIVE_ID/cfg/cfg.d
- Edit document_fields_default.pl, adding the following:
$data->{ep2dc_is_validated} = 'TRUE';
Save the changes.
- Edit document_fields.pl, adding the following field definitions:
       {
               name => "ep2dc_is_data",
               type => "boolean",
       },
       {
               name => "ep2dc_is_validated",
               type => "boolean",
       },
       {
               name => "ep2dc_data_centre",
               type => "set",
               options => [ "mdc", "ndc", "amcc" ],
       },
       {
               name => "ep2dc_test_type",
               type => "set",
               options => [ "tensile", "creep", "fatigue", "impact", "fcg", "ccg" ],
       },
       {
               name => "ep2dc_test_date",
               type => "date",
       },
       {
               name => "ep2dc_test_centre",
               type => "longtext",
       },
       {
               name => "ep2dc_object_id",
               type => "text",
       },
       {
               name => "ep2dc_security",
               type => "set",
               options => [ "openaccess", "restricted", "ondemand" ]
       }
Save the changes.
- Edit eprint_warnings.pl, adding the following to the end of the file:
push @problems, $session->make_text( "After clicking the deposit button, all EP2DC data files will automatically be transferred to the selected datacentre(s)." );
Save the changes.
- Edit eprint_render.pl as follows:
Look for the following piece of code:
my @documents = $eprint->get_all_documents();
Replace with:
my @documents = $eprint->get_all_documents(0);
Look for the following piece of code:
if( defined $files{$doc->get_main} )
Replace with:
if( defined $files{$doc->get_main} && !$doc->is_data() )
Where you want to display the EP2DC datasets, add the following:
       my $data_container = $session->make_element( "div", id => "ep_datadocs_container", style=>"width:80%;margin:auto;" );
       $page->appendChild( $data_container );
       my $wait_p = $session->make_element( "p", style=>"vertical-align: middle;width:100%;text-align:center;" );
       $data_container->appendChild( $wait_p );
       my $wait_img = $session->make_element( "img", border => "0", src => "/images/ajax_waiting.gif" );
       $wait_p->appendChild( $session->make_text( "Loading datasets...   " ) );
       $wait_p->appendChild( $wait_img );
       $page->appendChild( $session->make_javascript( "var datadocs = new Ajax.Updater( 'ep_datadocs_container', '/cgi/render_data_docs?eprintid=".$eprint->get_id."', { method:'get', onComplete: function(req) { \$('ep_datadocs_container').innerHTML = req.responseText;} } );" ) );
Save the changes.
- Update your workflow file in order to enable the upload of XML datasets to your EPrints repository:
Edit /opt/eprints3/archives/ARCHIVE_ID/cfg/worklows/eprint/default.xml, add the following stage definition (between the <flow> tags):
<stage ref="data"/>
and add the stage:
       <stage name="data">
               <component type="XHTML"><epc:phrase ref="Plugin/InputForm/Component/EP2DCUpload:help" /></component>
               <component type="EP2DCUpload">
                       <upload-methods>
                               <method>file</method>
                       </upload-methods>
                       <field ref="ep2dc_data_centre" required="yes" />
                       <field ref="ep2dc_test_type" required="yes" />
                       <field ref="ep2dc_test_date" required="yes" />
                       <field ref="ep2dc_test_centre" required="yes" />
                       <field ref="ep2dc_security" required="yes" />
               </component>
       </stage>
- Add the new fields to the database with
/opt/eprints3/bin/epadmin update_database_structure ARCHIVE_ID
- Link the CGI scripts to EPrints with
ln -s /opt/eprints3/archives/ARCHIVE_ID/cgi/* /opt/eprints3/cgi/
- Restart your web server, as root with
/etc/init.d/httpd restart
(note that this line might be different depending on which version of Linux you are running).
Data Centre Integration
The data centre integration relies on an EP2DC RESTful Web Services API. In the case of the Materials Data Centre, the end point is available at EP2DC Endpoint.
The out-of-the-box EP2DC module is designed to work with the EP2DC Web Services API. Documentation for implementing this API is available from Web Services API documentation.
Further technical information relating to data centre integration is available from the CodePlex EP2DC Documentation Page.
Development Roadmap
The EP2DC plugin is a prototype, and reports, and suggestions for improvements are welcomed. Presently, the roadmap for further development includes the following:
- Enable support for SSO.
- Integrate with other data centres in other scientific domains.
- Associate data with a pre-existing EPrints deposit.


