Difference between revisions of "Create a User"
m (adding categories upgrading and out of date) |
(Removed link to page that does not exist.) |
||
| Line 12: | Line 12: | ||
* The final screen lets you fill in some details for the user, only email and name are required. You add an initial password on this screen. Click "Save and Return" to finish the creation of the user. | * The final screen lets you fill in some details for the user, only email and name are required. You add an initial password on this screen. Click "Save and Return" to finish the creation of the user. | ||
[[File:Create_user_stage_2_ss.png|1000px| Stage 1 of the User workflow]] | [[File:Create_user_stage_2_ss.png|1000px| Stage 1 of the User workflow]] | ||
| − | * The EPrints "Create user" functionality is basic, so you will have to contact the relevant person and securely pass on its username and password, suggesting to change it appropriately using | + | * The EPrints "Create user" functionality is basic, so you will have to contact the relevant person and securely pass on its username and password, suggesting to change it appropriately using their ''Manage Profile'' link in the main menu once logged in. |
== Via server command line == | == Via server command line == | ||
Latest revision as of 12:13, 30 January 2022
As an administrator you can create an eprint user account by using the following steps.
Via Eprints admin interface
- Log in as an Eprints administrator
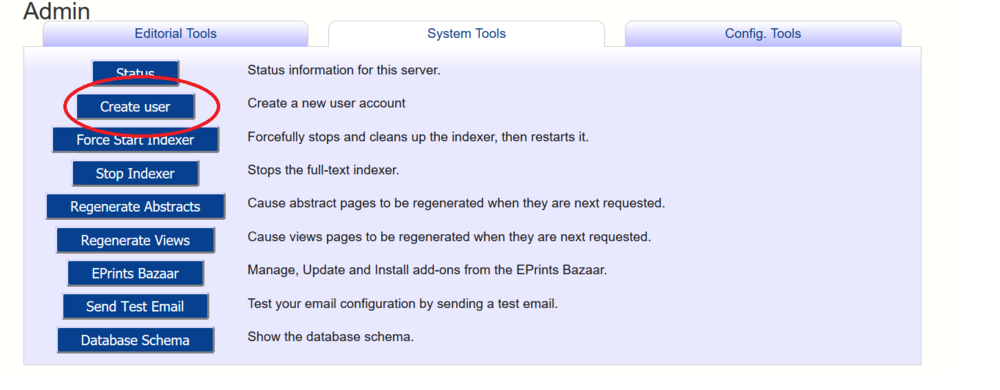
- Go to the "Admin" Screen, and then the "System Tools" tab. Finally click on the "Create user" button
- Enter the a username. This must be unqiue (but capitalization is irrelevant!) and will be the username that the new user must use to log in. Then click "Create User"
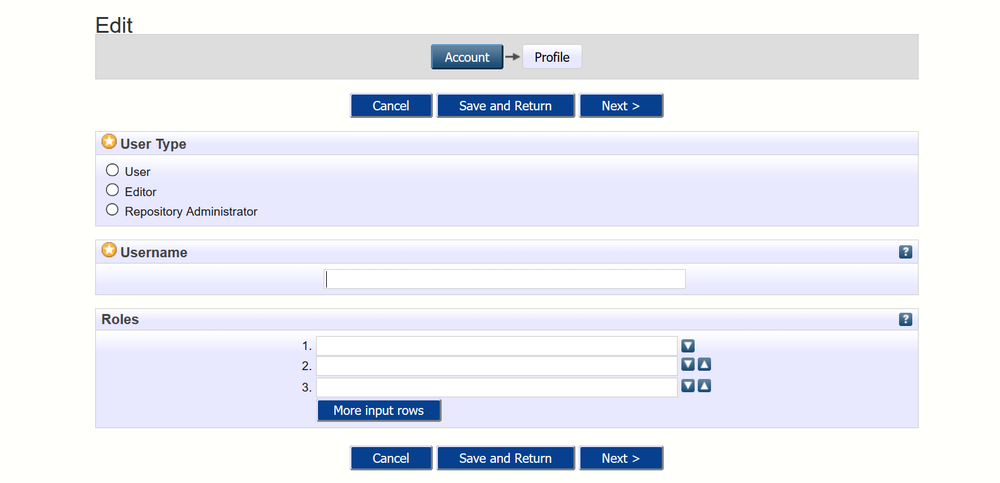
- The next screen allows you to choose the user type, i.e. "User", "Editor" or "Repository Administrator". You can also assign roles on this screen. Click "Next" to go to the next part of the form.
- The final screen lets you fill in some details for the user, only email and name are required. You add an initial password on this screen. Click "Save and Return" to finish the creation of the user.
- The EPrints "Create user" functionality is basic, so you will have to contact the relevant person and securely pass on its username and password, suggesting to change it appropriately using their Manage Profile link in the main menu once logged in.
Via server command line
- Log in to server (and change to eprints user)
- Run epadmin, entering username, permissions level, password and email address.
bash-4.1$ ./bin/epadmin create_user epprod
Creating a new user in REPOID
Enter a username [admin] ? NEW_USERNAME
Select a user type (minuser|user|editor|admin) [admin] ?
Enter Password?
Email? USER_NAME@EXAMPLE.COM
Successfully created new user:ID: 1234
epadmin will return a user ID for the newly created user.
When the users created this way log in, they will be called "Unnamed user with email" until their profile is updated to fill in their name.


